Installing Wall Sheathing A Step-by-Step Guide
Installing wall sheathing is crucial in building a sturdy and weather-resistant structure. This guide walks you through the entire process, from choosing the right materials to ensuring a proper and safe installation. We’ll cover various sheathing types, essential tools, detailed installation techniques, and troubleshooting common issues. Get ready to build a strong foundation for your project!
Whether you’re a seasoned pro or a DIY enthusiast tackling your first sheathing project, this comprehensive guide will equip you with the knowledge and confidence to complete the job efficiently and safely. We’ll break down complex aspects into easy-to-understand steps, complete with visuals and helpful tips to make the process smoother.
Types of Wall Sheathing
Source: hw.net
Choosing the right wgoegoeheathing is crucial for a building’s structural integrity, energy efficiency, and longevity. The best option depends on factors like budget, climate, and specific building requirements. Several materials are commonly used, each with its own set of advantages and disadvantages.
Comparison of Wall Sheathing Materials
The table below compares common wall sheathing materials based on cost, strength, moisture resistance, and ease of installation. These values are relative and can vary based on specific product brands and thicknesses.
| Material | Cost (Relative) | Strength (Relative) | Moisture Resistance (Relative) | Installation Difficulty (Relative) |
|---|---|---|---|---|
| Plywood | Medium-High | High | Medium | Medium |
| OSB (Oriented Strand Board) | Medium-Low | High | Medium-Low | Medium |
| Fiber Cement | High | High | High | Medium-High |
Plywood Sheathing
Plywood is a strong and versatile sheathing option made from thin layers of wood veneer glued together. Its consistent strength and relatively easy installation make it a popular choice for many residential and commercial projects. However, it’s more susceptible to moisture damage than some other options, making it less ideal for extremely humid or wet climates. In drier climates, its stability and strength are highly advantageous.
OSB Sheathing
Oriented Strand Board (OSB) is an engineered wood product made from wood strands bonded with resin. It offers comparable strength to plywood at a generally lower cost. OSB is less moisture-resistant than plywood and more prone to swelling or delamination in wet conditions. It’s a cost-effective choice for applications where moisture isn’t a major concern, such as interior walls in dry climates.
Fiber Cement Sheathing
Fiber cement sheathing is a non-combustible material made from a mixture of cement, cellulose fibers, and other additives. It boasts superior moisture resistance and fire protection compared to wood-based sheathing. Its high strength and durability make it suitable for high-wind areas or applications requiring exceptional protection. However, fiber cement is more expensive and can be more challenging to install than plywood or OSB due to its weight and potential for breakage.
Sheathing Selection Flowchart
The selection of appropriate sheathing involves considering several factors. A flowchart can help guide this decision-making process. Imagine a flowchart with these decision points:
1. Budget: High budget? Proceed to Fiber Cement. Medium budget? Proceed to Plywood/OSB. Low budget? Choose OSB.
2. Climate: Humid/Wet climate? Proceed to Fiber Cement. Dry climate? Proceed to Plywood/OSB.
3. Structural Requirements: High strength needed (e.g., high-wind areas)? Proceed to Fiber Cement or Plywood. Is standard strength sufficient? Proceed to Plywood or OSB.
4. Fire Safety: Is high fire safety required? Choose Fiber Cement. Is standard fire safety sufficient? Proceed to Plywood/OSB.
This flowchart guides the user through a series of choices based on the project’s needs, ultimately leading to the most appropriate sheathing material. For instance, a project with a high budget, located in a humid climate, and requiring high fire safety would naturally lead to the selection of fiber cement sheathing. Conversely, a project with a low budget, located in a dry climate, and with standard structural requirements would point towards OSB.
Tools and Materials Required

Source: homefixated.com
Getting the right tools and materials beforehand is crucial for a smooth and efficient wall sheathing installation. Having everything readily accessible will save you time and frustration, leading to a better-finished product. Proper preparation is key to a successful project.
This section details the necessary tools and materials, categorized for easy understanding. Remember to always prioritize safety and wear appropriate personal protective equipment (PPE) such as safety glasses and gloves throughout the installation process.
Tool Checklist
The tools needed can be broadly categorized into measuring, cutting, and fastening tools. Having a dedicated space for each tool category will greatly improve your workflow.
- Measuring: Tape measure (at least 25 feet), level (4-foot level minimum), chalk line, speed square.
- Cutting: Circular saw (with appropriate blade for sheathing material), reciprocating saw (for tight spaces and curves), utility knife (for smaller cuts and trimming).
- Fastening: Hammer (for nails), nail gun (pneumatic or cordless, significantly speeds up the process), screw gun (cordless is recommended for ease of use), drill (for pilot holes, if using screws).
- Other Essential Tools: Safety glasses, work gloves, hearing protection, knee pads, pry bar (for removing obstacles or stubborn pieces), measuring square.
Fastener Selection and Quantities
The type and quantity of fasteners depend heavily on the sheathing material (OSB, plywood, etc.), wall construction (framing spacing, etc.), and local building codes. Always consult local building codes and manufacturer recommendations for specific requirements.
- OSB Sheathing: Typically uses 8d or 10d galvanized nails or construction screws. For a standard 4×8 sheet of OSB, you’ll likely need approximately 60-80 fasteners. This will depend on spacing requirements. Always check the manufacturer’s recommendations.
- Plywood Sheathing: Similar to OSB, 8d or 10d galvanized nails or construction screws are common. The number will vary depending on the thickness of the plywood and the spacing of the framing. Again, refer to the manufacturer’s specifications.
- Other Sheathing Materials: Different sheathing materials may require specialized fasteners. Always check the manufacturer’s instructions for specific recommendations.
Workspace Organization
A well-organized workspace significantly enhances efficiency and safety. Keep tools and materials readily accessible to minimize wasted time and movement.
- Designated Tool Area: A central location for all tools, categorized for easy retrieval. Consider using tool belts or a tool caddy for frequently used items.
- Material Staging: Stack sheathing near the work area, but not in a way that obstructs movement. Keep fasteners organized and easily accessible in separate containers.
- Waste Disposal: Have a designated area for scrap materials and debris to maintain a clean and safe workspace.
- Safety Zone: Ensure adequate space around the work area to prevent accidents. Keep walkways clear and free from obstructions.
- Visual Representation: Imagine a clean, open area. One side has stacks of sheathing neatly organized. Next to it, is a tool station with clearly labeled bins for different tool types. On the other side, is a designated area for waste disposal. The central work area is clear, allowing for easy movement and installation.
Installation Procedures and Techniques

Source: pressablecdn.com
Installing wall sheathing is a crucial step in building a sturdy and weather-resistant structure. Proper installation ensures the sheathing effectively transfers loads from the walls to the framing, providing a solid base for siding and insulation. This section details the step-by-step process, highlighting key techniques for optimal results.
Before you begin, ensure you have all your materials and tools ready. Having everything organized will save you time and frustration. Always double-check your measurements and plan your sheathing layout to minimize waste and ensure proper alignment with structural elements.
Starting the Installation
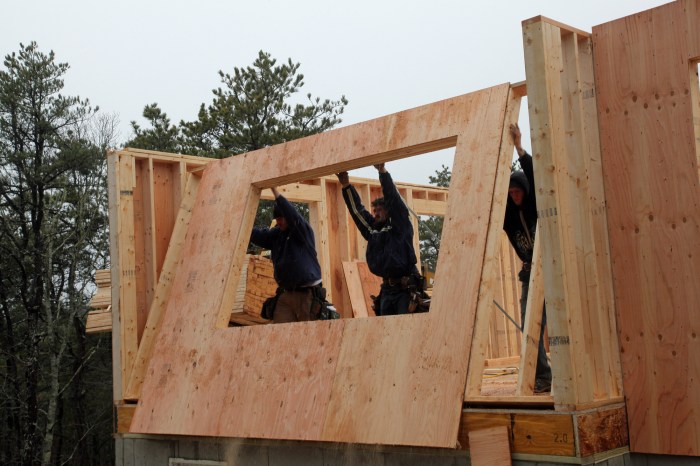
Begin installation at a corner of the wall, ensuring the first sheet is perfectly aligned with the studs and plumb. Use a level to check for vertical alignment and make any necessary adjustments before fastening. This initial alignment sets the standard for the rest of the installation, preventing cumulative errors that could lead to misaligned walls. Securing the first sheet properly is essential for a stable foundation. Start with a full sheet, rather than a partial one, to provide a strong base for the subsequent sheathing.
Fastening Techniques
Use appropriate fasteners for your sheathing material and framing. Generally, nails or screws are used, and the number and spacing will vary depending on the sheathing type, building codes, and local climate conditions. Always follow the manufacturer’s recommendations for fastener type, length, and spacing. For example, using nails that are too short can result in loose sheathing, while nails that are too long can penetrate the exterior wall covering. Consistent spacing ensures even load distribution across the sheathing. Drive fasteners straight and flush to avoid damaging the sheathing or creating weak points.
Sheathing Overlap and Staggering
Proper overlap and staggering of sheathing panels is critical for preventing water penetration and maximizing structural integrity. Typically, sheathing panels should overlap by at least 1-1/2 inches at the edges. Stagger the seams of adjacent panels to create a strong, interlocking pattern. This prevents weak points in the sheathing where water could potentially penetrate. Imagine a brick wall; the staggered pattern provides strength and stability. Similarly, staggering the sheathing seams creates a much stronger wall assembly.
Handling Sheathing Panels
Wall sheathing panels can be large and unwieldy. Use appropriate lifting techniques to avoid injury and damage to the panels. Consider using a helper, especially for larger panels. Never drop or forcefully throw the panels. Support the panels at their edges to prevent warping or bending. Careful handling minimizes the risk of damage and ensures the sheathing remains straight and true.
Common Mistakes and Their Consequences
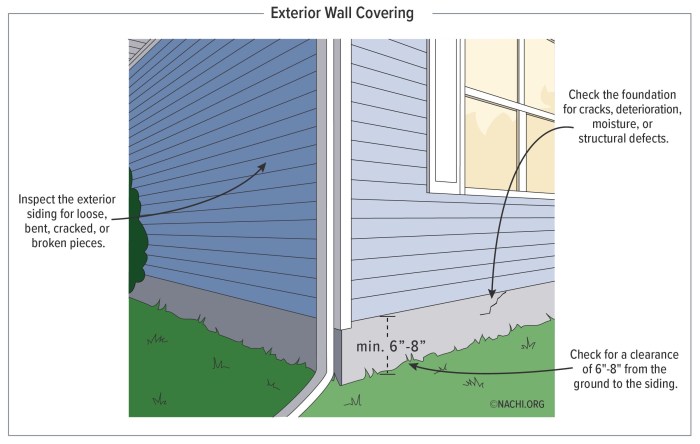
Using improper fasteners can lead to sheathing failure and potential structural damage. Failing to properly stagger seams can create pathways for water to enter the wall cavity, causing rot and mold. Improper alignment of the initial sheathing panels can lead to cumulative errors, resulting in misaligned walls and difficulty installing subsequent layers. Neglecting to check for plumb and level throughout the installation can result in an uneven wall surface, making it difficult to install siding or other exterior finishes. Finally, insufficient sheathing can compromise the structural integrity of the wall, leaving it vulnerable to wind damage.
Dealing with Obstacles and Irregularities

Source: savingsustainably.com
Installing wall sheathing isn’t always a straightforward process. You’ll inevitably encounter obstacles like windows, doors, and uneven wall surfaces. Knowing how to handle these situations efficiently and effectively is crucial for a professional-looking and structurally sound finished product. Proper techniques for cutting, fitting, and securing sheathing around openings and on irregular walls are key to success.
Sheathing Around Openings, Installing wall sheathing
Cutting and fitting sheathing around windows and doors requires precision and careful measurement. Begin by accurately measuring the opening. Then, transfer those measurements to your sheathing panel. Use a sharp utility knife or circular saw with a fine-tooth blade for clean cuts. For intricate cuts, a jigsaw is often preferable. Remember to always wear appropriate safety gear, including eye protection and hearing protection when using power tools. Once cut, test-fit the sheathing before securing it with nails or screws. Use construction adhesive for added strength and to prevent squeaking. For larger openings, consider using multiple smaller pieces of sheathing to create a more manageable and secure installation. Properly fastening the sheathing to the framing around the opening is vital to prevent movement and ensure stability. Remember to account for expansion and contraction, leaving a small gap between the sheathing and the window or door frame.
Sheathing Uneven or Sloped Walls
Uneven or sloped walls present a greater challenge. Accurate measurements are paramount. You may need to cut sheathing panels to varying sizes to conform to the wall’s contours. Start by installing sheathing in the most level areas first, working your way towards the more irregular sections. Use shims to create a level surface for the sheathing panels, ensuring proper alignment. For significant slopes, consider using furring strips to create a more even surface before installing the sheathing. This will create a consistent plane for the sheathing to rest upon. Secure the sheathing with nails or screws, ensuring that the fasteners are driven straight and at the correct depth to avoid splitting the sheathing. Remember to check for alignment frequently throughout the process. A level and plumb bob are invaluable tools for ensuring accuracy.
Handling Damaged or Defective Sheathing
Even with careful handling, damage or defects can occur. Inspect each panel thoroughly before installation. Minor damage, such as small dents or scratches, can often be repaired with wood filler. Allow the filler to dry completely before sanding smooth. However, significantly damaged or warped panels should be replaced. Attempting to install damaged sheathing will compromise the structural integrity and overall appearance of the wall. When replacing a panel, ensure that the replacement panel matches the existing sheathing in terms of material, thickness, and finish. Remember to follow the same installation techniques as with undamaged panels, ensuring proper alignment, cutting, and fastening.
Safety Precautions and Best Practices

Source: pressablecdn.com
Wall sheathing installation, while seemingly straightforward, presents several potential hazards if safety isn’t prioritized. Proper safety measures not only protect you from injury but also ensure a more efficient and effective installation process. This section Articulates essential safety procedures and best practices to keep you safe throughout the project.
Safe handling and use of tools and materials are paramount. Remember that even seemingly minor precautions can significantly reduce the risk of accidents.
Personal Protective Equipment (PPE)
Appropriate personal protective equipment is crucial for minimizing risks during wall sheathing installation. This includes but isn’t limited to, safety glasses or goggles to protect your eyes from flying debris, hearing protection to reduce the noise from power tools, work gloves to protect your hands from splinters and cuts, and sturdy work boots with good ankle support to prevent slips, trips, and falls. A hard hat is also recommended, especially when working at heights or in areas where falling objects are a possibility. Consider using a dust mask or respirator if working with materials that produce significant dust.
Safe Handling and Storage of Sheathing Materials
Proper handling and storage of sheathing materials are vital to prevent damage and injury. Always lift heavy sheets with your legs, not your back, and use appropriate lifting techniques to avoid strains and injuries. Store materials on a level, stable surface to prevent them from tipping or falling. Keep the storage area dry to prevent warping or rot. When transporting sheets, use appropriate straps or equipment to secure them and prevent them from shifting during transport. Stack materials neatly and evenly to avoid instability. Avoid stacking materials too high to prevent collapse.
Potential Hazards and Mitigation Strategies
Safe work practices are key to preventing accidents. Here’s a list of potential hazards and how to mitigate them:
- Falling from heights: Always use appropriate fall protection equipment when working at heights, such as scaffolding with guardrails or a safety harness. Ensure the scaffolding is stable and properly secured.
- Cuts and lacerations: Handle sheathing materials carefully to avoid cuts. Use gloves and always point sharp edges away from your body. Inspect tools regularly for damage and replace damaged tools immediately.
- Eye injuries: Wear safety glasses or goggles at all times to protect your eyes from flying debris. Always wear eye protection when using power tools.
- Hearing damage: Use hearing protection when operating noisy power tools. Take regular breaks to allow your ears to recover from prolonged exposure to loud noises.
- Back injuries: Lift heavy sheets with your legs, not your back. Use proper lifting techniques and consider using mechanical assistance for exceptionally heavy loads.
- Exposure to hazardous materials: Some sheathing materials may contain hazardous substances. Always follow the manufacturer’s safety guidelines and wear appropriate PPE. Ensure adequate ventilation in the work area.
- Fire hazards: Be mindful of fire hazards when working with power tools. Keep a fire extinguisher nearby and ensure that the work area is free of flammable materials.
- Trip hazards: Keep the work area clean and free of debris to prevent tripping. Use caution when working around uneven surfaces or obstacles.
Finishing and Inspection

Source: pressablecdn.com
After installing your wall sheathing, a thorough inspection is crucial to ensure a solid foundation for the rest of your construction project. This final check ensures proper alignment, secure fastening, and overall quality, preventing costly issues down the line. Proper preparation for subsequent steps, such as installing house wrap, is also key to a smooth and efficient building process.
Inspecting the installed sheathing involves a systematic review of several key aspects to confirm everything meets the required standards. This careful process helps to identify any problems early on, allowing for timely corrections before moving to the next stage of construction. This ultimately saves time, and material ls, and reduces potential rework.
Sheathing Inspection Procedures
A systematic inspection should be performed to ensure the sheathing is correctly installed. This involves checking for proper alignment, verifying that all fasteners are correctly driven and secured, and assessing the overall quality of the installation. Look for any gaps, damage, or inconsistencies that may compromise the structural integrity of the building envelope. Proper inspection is vital to ensuring a durable and long-lasting wall assembly.
Preparing Sheathing for Subsequent Steps
Once the inspection is complete and any necessary repairs are made, the sheathing needs to be prepared for the next phase of construction. This often involves cleaning the sheathing to remove any debris, ensuring a clean surface for proper adhesion of house wrap or other exterior coverings. Any protruding nails or fasteners should be set properly, and damaged areas should be repaired or replaced.
Wall Sheathing Inspection Checklist
This checklist helps ensure a thorough inspection. Use it to systematically check all aspects of the installed sheathing.
| Category | Item | Acceptable | Unacceptable |
|---|---|---|---|
| Alignment | Sheathing alignment with framing | The sheathing is properly aligned and flushes with framing members. | The sheathing is misaligned, and gaps exceeding 1/8 inch exist. |
| Fastening | Number and spacing of fasteners | Fasteners are properly spaced and driven according to the manufacturer’s specifications. | Fasteners are missing, improperly spaced, or not fully driven. |
| Sheathing Condition | Damage or defects | The sheathing is free from damage, cracks, or significant imperfections. | Sheathing shows signs of damage, cracks, or significant imperfections. |
| Overall Quality | Overall installation quality | Installation is neat, consistent, and meets all building codes and specifications. | Installation is sloppy, inconsistent, or does not meet building codes and specifications. |
Closing Summary: Installing Wall Sheathing

Source: pinimg.com
Successfully installing wall sheathing is all about careful planning, proper technique, and attention to detail. By following the steps ArtikelArtikels guide, you’ll ensure a strong, durable, and weather-resistant wall system. Remember to prioritize safety throughout the process, and don’t hesitate to consult with professionals if you encounter any unexpected challenges. With a little preparation and the right approach, you’ll be well on your way to completing your project with pride!