Exterior Roof Insulation Panels A Comprehensive Guide
Exterior roof insulation panels offer a powerful way to boost your home’s energy efficiency and comfort. These panels, available in various materials like polyurethane, polyisocyanurate, and expanded polystyrene, sit atop your existing roof, creating an extra layer of thermal protection. This guide dives deep into their types, installation, benefits, drawbacks, environmental impact, and regulatory considerations, equipping you with the knowledge to make an informed decision.
We’ll explore the different panel materials, comparing their R-values, costs, and lifespans. We’ll then walk you through the installation process, from preparation to sealing, highlighting essential tools and techniques. Finally, we’ll examine the long-term cost savings, environmental impact, and compliance aspects to give you a complete picture of exterior roof insulation panels.
Types of Exterior Roof Insulation Panels
Source: com.au
Exterior roof insulation panels are crucial for energy efficiency and building longevity. Choosing the right type depends on factors like budget, climate, and the specific needs of your project. This section details the various materials, their performance, and manufacturing processes.
Material Properties and Thermal Performance
Exterior roof insulation panels are commonly made from polyurethane, polyisocyanurate (polyiso), and expanded polystyrene (EPS). Each material offers a unique thermal performance, cost, and durability balance. Polyurethane, known for its closed-cell structure, provides excellent insulation and moisture resistance. Polyiso, a closed-cell material, boasts high R-values and good dimensional stability. Expanded polystyrene, an open-cell material, is generally less expensive but offers lower R-values and is more susceptible to moisture absorption. The R-value, representing thermal resistance, is a key indicator of a panel’s effectiveness in reducing heat transfer. Higher R-values signify better insulation.
Manufacturing Processes
The manufacturing process significantly influences the final properties of the insulation panels. Let’s examine three common methods:
Polyurethane Panel Production
Polyurethane panels are created using a continuous process. Two components, a polyol and an isocyanate, are precisely mixed and poured into a mold. A catalyst initiates a rapid chemical reaction, causing the mixture to expand and solidify into a rigid foam. The resulting panel is then cut to size and may undergo further processing, such as adding facings for protection and improved aesthetics.
Polyisocyanurate Panel Production
Polyiso panel production is similar to polyurethane, but it incorporates additional chemicals to enhance its thermal performance and fire resistance. The precise formulation and manufacturing process influence the final R-value and physical properties. The foam is often formed in a continuous process, similar to polyurethane, and then trimmed and faced.
Expanded Polystyrene Panel Production
EPS panels are manufactured using a bead expansion process. Small polystyrene beads are heated and expanded with a blowing agent, then molded under pressure and heat into the desired shape and size. The process is less complex and generally less energy-intensive than the production of polyurethane and polyiso panels. The resulting panels are often lighter than the other types.
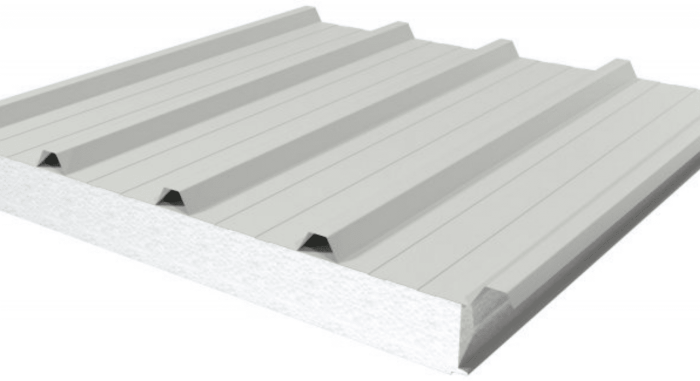
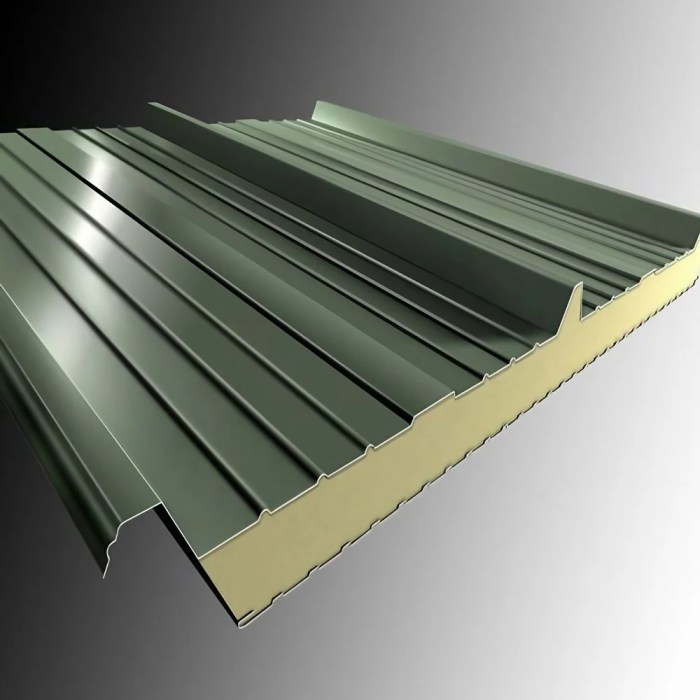
Comparison of Exterior Roof Insulation Panels
The following table summarizes the key characteristics of three common exterior roof insulation panel types:
| Material | R-Value (per inch) | Approximate Cost (per sq ft) | Typical Lifespan (years) |
|---|---|---|---|
| Polyurethane | 6-7 | $0.80 – $1.50 | 30-50 |
| Polyisocyanurate | 6-8 | $1.00 – $2.00 | 30-50 |
| Expanded Polystyrene | 3-4 | $0.50 – $1.00 | 20-30 |
*Note: R-values and costs can vary depending on thickness, manufacturer, and regional factors. Lifespan estimates assume proper installation and maintenance.*
Installation Methods for Exterior Roof Insulation Panels
Source: amazonaws.com
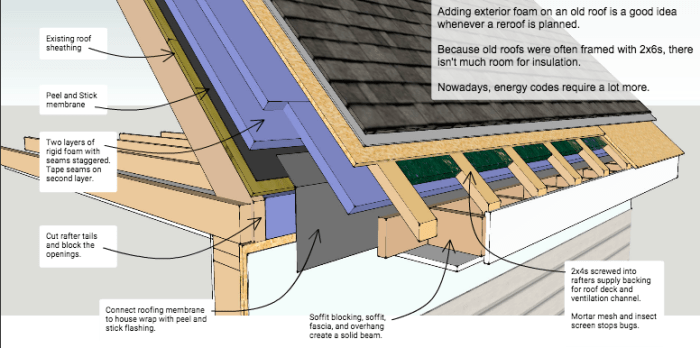
Installing exterior roof insulation panels is a significant undertaking that improves energy efficiency and protects your roof. Proper installation requires careful planning, the right tools, and attention to detail to ensure a long-lasting, weathertight seal. This process typically involves several key steps, from preparation to final sealing.
Preparation for Installation
Before beginning installation, a thorough assessment of the roof is crucial. This includes checking for any existing damage, such as cracks, loose shingles or deteriorated flashing. All necessary repairs should be completed before installing the insulation panels. The roof surface should be clean and dry, free of debris like leaves, dust, or loose materials. Existing roofing should be in good condition to provide a solid base for the new insulation. Furthermore, you’ll need to measure the roof accurately to determine the number and size of panels required, minimizing waste and ensuring a proper fit.
Tools and Equipment
Proper tools are essential for a successful installation. You’ll need a measuring tape, a level, a utility knife or circular saw (depending on the panel type), a drill with appropriate drill bits, fasteners suitable for your roofing material and insulation panel type (e.g., screws, nails), sealant (compatible with both the panels and the roofing material), safety glasses, work gloves, and possibly a ladder or scaffolding for safe access to the roof. For larger projects, a pneumatic nail gun might increase efficiency. A chalk line can aid in marking straight lines for panel placement.
Fastening the Insulation Panels
Once the roof is prepared, the installation of the insulation panels can begin. Panels are typically installed starting at the lowest point of the roof and working upwards. Using the measurements taken earlier, panels are positioned and secured using appropriate fasteners. Ensure that panels are aligned properly and that fasteners are driven straight to avoid damage to the panels or the underlying roof. Overlap panels according to the manufacturer’s instructions, typically creating a staggered pattern to ensure a continuous and weathertight barrier. The spacing between fasteners should also adhere to manufacturer guidelines.
Sealing the Insulation Panels
Proper sealing is critical for preventing water penetration and maintaining the insulation’s effectiveness. After all panels are fastened, apply sealant along all seams and edges, paying particular attention to areas where panels overlap or meet other roofing components like vents or chimneys. Ensure that the sealant is compatible with both the insulation panels and the existing roofing materials. Allow the sealant to fully cure before considering the installation complete. A high-quality sealant will resist weathering and provide a durable, waterproof barrier.
Best Practices for Weathertight and Energy-Efficient Installation
Several best practices can significantly improve the overall performance and longevity of the insulation installation. Working in suitable weather conditions (avoiding rain, snow, or extreme temperatures) is paramount. Using the correct fasteners and sealant for your specific roofing and insulation materials is crucial for a weathertight seal. Always follow the manufacturer’s instructions meticulously, as they provide vital details for optimal installation and performance. Regularly inspect the installation for any signs of damage or deterioration after completion.
Potential Challenges and Solutions
Proper planning can mitigate many potential installation challenges. Below are some common issues and their solutions:
- Uneven Roof Surface: An uneven roof surface can make it difficult to install panels flush. Solution: Use shims or adjust panel placement to accommodate minor inconsistencies. For significant unevenness, consider additional preparation work to level the surface.
- Difficult-to-Reach Areas: Installing panels on steep roofs or in tight spaces can be challenging. Solution: Use appropriate safety equipment like harnesses and scaffolding. Consider using smaller, more manageable panel sizes for difficult areas.
- Incorrect Fastener Placement: Improper fastener placement can lead to leaks or panel damage. Solution: Use a level and measuring tape to ensure proper spacing and alignment. Pre-drill pilot holes to prevent splitting panels.
- Sealant Failure: Using incompatible sealant or improper application can result in leaks. Solution: Use a high-quality sealant specifically designed for exterior applications and follow the manufacturer’s instructions for application.
- Wind Damage: High winds can dislodge panels during or after installation. Solution: Ensure panels are securely fastened and consider using additional wind-resistant measures if necessary.
Benefits and Drawbacks of Exterior Roof Insulation
Source: com.au
Exterior roof insulation offers a compelling solution for improving energy efficiency and comfort in buildings. By installing insulation on the exterior of the roof, you create a significant barrier against heat transfer, leading to numerous advantages, but also some potential downsides that should be carefully considered. This section details both the benefits and drawbacks to help you make an informed decision.
Energy Efficiency Improvements
Exterior roof insulation significantly reduces heat transfer through the roof. In hot climates, it keeps the interior cooler, reducing the strain on air conditioning systems and lowering energy bills. Conversely, in cold climates, it prevents heat loss, minimizing the need for heating and again, leading to cost savings. The effectiveness of exterior insulation is often superior to interior insulation because it eliminates thermal bridging – the transfer of heat through structural components like rafters or joists. For example, a home in a region with extreme temperature swings might see a reduction in energy consumption by 20-30% or more, depending on the existing insulation levels and the type of exterior insulation used. This translates directly into substantial long-term savings on utility bills.
Noise Reduction Capabilities
Exterior roof insulation acts as an effective sound barrier, reducing noise pollution from outside sources. This is particularly beneficial for homes located in noisy areas near busy roads, airports, or industrial sites. The insulation material itself absorbs and dampens sound waves, preventing them from penetrating the roof and disturbing the interior. The thickness of the insulation plays a significant role; thicker layers provide greater noise reduction. Imagine a home near a highway; exterior roof insulation can significantly reduce the constant hum of traffic, creating a quieter and more peaceful living environment. The improvement in sound insulation could be the equivalent of reducing the perceived noise level by several decibels, offering a noticeable difference in comfort.
Potential Drawbacks and Limitations, Exterior roof insulation panels
While offering numerous advantages, exterior roof insulation is not without its drawbacks. The initial installation cost can be higher compared to interior insulation, though long-term savings often offset this initial investment. Another factor to consider is the potential for moisture issues if the installation is not properly executed. If not properly sealed, water can penetrate the exterior insulation, leading to damage to the roof structure and the insulation itself. This requires careful planning and skilled installation to prevent such problems. Additionally, the aesthetic appearance of the building might be altered, though this can be minimized with careful material selection and professional installation. Finally, depending on the building’s existing structure, modifications may be required to accommodate the additional thickness of the insulation, potentially adding to the overall project cost.
Long-Term Cost Comparison
When comparing the long-term cost savings of exterior roof insulation with traditional interior methods, the former often emerges as a more financially advantageous option. While the upfront costs might be higher, the reduced energy consumption and extended lifespan of the roof due to better protection from the elements result in substantial long-term savings. For example, a study might show that while interior insulation might cost $5,000 and reduce energy bills by 15%, exterior insulation, costing $10,000 initially, could reduce energy bills by 30%. Over 20 years the higher initial cost of exterior insulation could be more than compensated for by the greater energy savings, resulting in significant net savings. The longer lifespan of the roof, due to protection from weather elements provided by exterior insulation, also contributes to these long-term cost advantages.
Environmental Impact and Sustainability: Exterior Roof Insulation Panels

Source: perfectmoc.com
Choosing exterior roof insulation panels involves considering not only their performance but also their environmental impact throughout their lifecycle. From manufacturing to disposal, the materials and processes used significantly affect the overall sustainability of your roofing project. Understanding these factors helps make informed decisions that align with environmental responsibility.
The environmental impact of exterior roof insulation panels is multifaceted, encompassing the energy used in manufacturing, the embodied carbon in the materials, and the potential for recycling and reuse at the end of their lifespan. Different panel types have varying environmental profiles, demanding a careful assessment before making a choice.
Manufacturing Process Impacts
The manufacturing process for various exterior roof insulation panels significantly impacts the environment. For example, the production of polyurethane foam panels often involves the use of blowing agents, some of which have high global warming potentials. The energy required to manufacture these panels, including electricity and fuel consumption, also contributes to greenhouse gas emissions. In contrast, panels made from recycled materials or those utilizing less energy-intensive production methods generally have a smaller carbon footprint. The extraction and processing of raw materials like fiberglass and mineral wool also have associated environmental costs, including land use and potential water pollution. These factors must be carefully weighed when comparing the different panel options.
Recyclability and Material Sustainability
The recyclability and sustainability of the materials used in exterior roof insulation panels vary greatly. Some panels, such as those made from recycled content, offer a more sustainable choice. For instance, panels incorporating recycled plastics or other post-consumer waste reduce reliance on virgin materials and lessen the environmental burden of landfill waste. However, the recyclability of certain materials, like polyurethane foam, can be limited depending on local recycling infrastructure and the availability of appropriate processing facilities. The longevity and durability of the panels also play a crucial role in sustainability. Panels with longer lifespans reduce the frequency of replacement and the associated environmental costs of manufacturing and disposal.
Eco-Friendly Options
Several eco-friendly options are available in exterior roof insulation panels. Panels made from recycled materials, such as recycled plastic or glass, offer a sustainable alternative to those made from virgin materials. Similarly, panels with low global warming potential (GWP) blowing agents represent a significant improvement over those using high-GWP options. Panels made from natural materials, such as sheep’s wool or cellulose, provide another eco-friendly option, though their performance characteristics may differ from synthetic options. The use of sustainably harvested wood fiber in some panels also contributes to a more environmentally responsible approach. Choosing panels with certifications, such as those from organizations like the Green Building Certification Institute (LEED), can help ensure that they meet specific environmental standards.
Overall Environmental Footprint
The overall environmental footprint of exterior roof insulation panels depends on several factors, including the type of material used, the manufacturing process, transportation distance, and end-of-life management. While offering significant energy savings over the building’s lifespan, the embodied carbon and manufacturing emissions associated with the panels themselves should be considered. A comprehensive life-cycle assessment (LCA) can provide a more accurate picture of the environmental impact, comparing the various options available and assisting in the selection of the most sustainable choice for a particular project. For example, a building project in a region with a robust recycling infrastructure might prioritize panels with higher recyclability, while a project in a remote area might favor panels with lower embodied carbon to minimize transportation emissions.
Code Compliance and Regulations
Source: imimg.com
Installing exterior roof insulation panels requires careful adherence to local building codes and regulations. These codes are designed to ensure the safety, structural integrity, and energy efficiency of buildings. Failure to comply can lead to project delays, costly modifications, and even legal repercussions. Understanding these regulations is crucial for a successful project.
Exterior roof insulation panel installations are governed by a complex interplay of national, regional, and local building codes. These codes often address aspects like fire resistance, thermal performance, wind load resistance, and water penetration prevention. Specific requirements vary significantly depending on factors such as climate zone, building type, and local ordinances. For example, areas prone to hurricanes might have stricter wind load requirements, while those with high snowfall might have specific insulation thickness stipulations. It’s important to consult all applicable codes before starting any work.
Variability in Local Building Codes
Local building codes are not uniform across different jurisdictions. For instance, one city might require a specific type of fire-resistant insulation for roofs, while another might allow a broader range of materials. Similarly, requirements for the attachment methods of insulation panels, including the type and spacing of fasteners, can differ considerably. Some areas may have stricter energy efficiency standards, demanding higher R-values for insulation compared to others. This necessitates a thorough review of the specific codes applicable to the project location. Ignoring these variations can result in non-compliance and subsequent penalties.
Potential Compliance Issues and Avoidance Strategies
Failing to obtain necessary permits before starting work is a common compliance issue. Improper installation techniques, such as inadequate fastening or sealing, can compromise the structural integrity and energy efficiency of the roof, leading to code violations. Using insulation materials that don’t meet the required fire ratings or thermal performance standards is another frequent problem. To avoid these issues, always obtain all necessary permits, meticulously follow the manufacturer’s installation instructions, and ensure that all materials used meet or exceed the minimum requirements specified in the local building codes. Regularly consult with building inspectors throughout the project to address any questions or concerns that may arise.
Resources for Finding Local Building Codes and Regulations
Finding and understanding local building codes can sometimes be challenging. However, several resources are available to assist in this process.
- Local Building Department: This is the primary source for local building codes. Contact your local building department directly for information and clarification.
- International Code Council (ICC): The ICC develops and publishes model building codes widely adopted across the US. Their website provides access to these codes and related resources.
- State Building Codes: Many states have their building codes that supplement or modify the ICC model codes. Check your state’s government website for these codes.
- Online Building Code Databases: Several online databases provide access to building codes, often searchable by location.
Visual Representation of Installation

Source: strukturoc.com
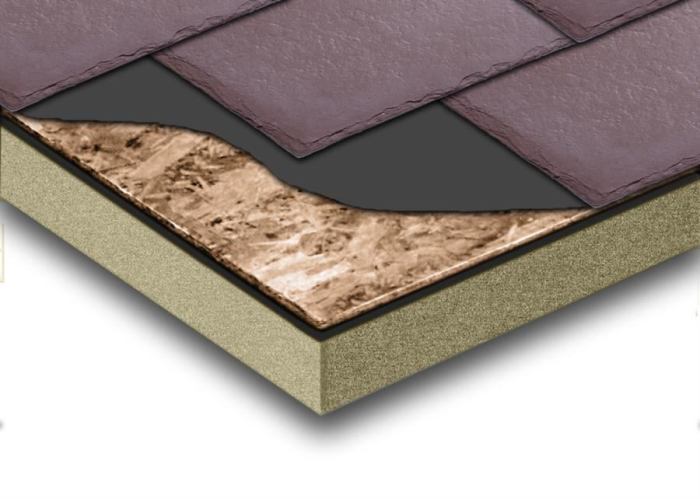
Properly installed exterior roof insulation panels present a clean, uniform appearance, contributing significantly to the overall aesthetic appeal and energy efficiency of a building. Understanding the visual aspects of a successful installation is crucial for both homeowners and contractors. This section will detail the key visual characteristics of a well-installed system, contrasting them with the telltale signs of poor workmanship.
A correctly installed system showcases neat, aligned panels with minimal visible gaps between them. The panel seams should be flush and consistent, demonstrating proper fitting and adherence to the manufacturer’s specifications. Fasteners, whether visible or hidden, should be evenly spaced and securely attached, ensuring the panels remain firmly in place against wind uplift and other environmental stresses. The overall look should be one of seamless integration with the existing roofing structure, minimizing any noticeable transitions or disruptions to the roofline.
Panel Seams and Fasteners
Properly installed panels exhibit tight, straight seams. These seams should be nearly invisible from a distance, indicating precise cutting and alignment of the panels during installation. Fasteners, typically screws or nails, should be uniformly spaced and driven flush with the panel surface, or countersunk where appropriate, avoiding any protrusion that could damage the roofing membrane or compromise the weatherproofing. Visible fasteners should be consistent in type and color, enhancing overall visual uniformity. Improper installation might show uneven gaps, misaligned panels, and haphazardly placed fasteners, leading to potential water ingress and structural weakness.
Integration with Roofing Materials
The seamless integration of insulation panels with various roofing materials is a key visual element of a successful installation. For example, with asphalt shingles, the panels should sit neatly beneath the shingles, providing a smooth, even substrate. The transition between the insulation panels and the shingle edge should be unobtrusive, avoiding any visible bulges or inconsistencies. With metal roofing, the panels should provide a stable, even surface for the metal sheets to rest upon, resulting in a flat, uniform roofline. With tile roofs, the panels may be installed underneath the underlayment, ensuring the tile sits securely and evenly on the insulated surface. Poor integration might result in visible gaps or overlaps between the insulation and the roofing material, compromising the overall aesthetic and potentially creating areas vulnerable to water damage.
Appearance from Various Angles
From a ground-level view, a correctly insulated roof appears smooth and uniform, with a consistent color and texture across its surface. The roofline should be uninterrupted, and the panels should blend seamlessly with the existing roofing material. From a closer perspective, individual panels should be neatly aligned, with minimal visible seams or fasteners. From an aerial view, the overall consistency and uniformity of the insulation panel installation will be visible, showcasing the quality of the workmanship. An improperly installed roof, viewed from any angle, might display unevenness, gaps, or misaligned panels, compromising the visual appeal and raising concerns about potential structural and weatherproofing issues.
Improperly Installed Panels
Improperly installed panels are easily identifiable through several visual cues. Uneven gaps between panels indicate poor fitting or inadequate preparation of the underlying roof structure. Misaligned panels create a visually unappealing patchwork effect, highlighting mistakes in measurement and installation. Visible fasteners that are protruding, unevenly spaced, or of inconsistent type, detract from the overall aesthetic and indicate sloppy workmanship. Buckling or warping of the panels might signify improper handling or exposure to excessive moisture during or after installation. In extreme cases, missing panels or significant areas of exposed roof decking are clear indicators of a poorly executed insulation project.
Closing Summary
Source: hw.net
Ultimately, deciding on exterior roof insulation panels involves weighing the significant energy savings, noise reduction, and increased comfort against the initial investment and potential installation complexities. By understanding the various panel types, installation procedures, and long-term implications, you can confidently assess whether this solution aligns with your home’s needs and budget. Remember to always check local building codes and consult with qualified professionals for optimal results.