Building Sheathing A Comprehensive Guide
Building sheathing: It’s the unsung hero of construction, the sturdy layer that provides structural integrity, weather protection, and energy efficiency to your building. This guide dives deep into the world of building sheathing, exploring different materials, installation techniques, and the crucial role they play in a building’s overall performance. We’ll cover everything from choosing the right sheathing for your project to ensuring proper installation to meet building codes and maximize energy savings.
We’ll examine various sheathing materials like plywood and OSB, comparing their strengths, weaknesses, and costs. You’ll learn proper fastening techniques, understand the importance of moisture management, and discover how sheathing contributes to a building’s structural integrity and resistance to wind and seismic forces. By the end, you’ll be equipped with the knowledge to confidently select and install sheathing for your next project.
Types of Building Sheathing

Source: maisonlyinteriordesign.com
Building sheathing is a crucial component of any home’s structure, providing strength, stability, and a surface for the exterior cladding. Choosing the right sheathing material depends on factors like budget, climate, and the overall design of the building. Several options exist, each with its advantages and disadvantages.
Plywood and OSB Sheathing: A Comparison
Plywood and Oriented Strand Board (OSB) are the most common sheathing materials. Both are engineered wood products, but their construction and properties differ. Plywood consists of thin layers of wood veneer glued together with the grain of adjacent layers oriented at right angles. This cross-grain construction provides excellent strength and stability. OSB, on the other hand, uses wood flakes or strands bonded together with resin. The strands are oriented in layers, similar to plywood, but the resulting material is generally less dense and has a more textured surface.
Plywood generally offers superior moisture resistance compared to OSB, making it a better choice in climates with high humidity or frequent rainfall. However, OSB is typically less expensive than plywood, making it a popular budget-friendly option. In terms of strength, both materials are suitable for most residential applications, although plywood often exhibits slightly higher strength properties.
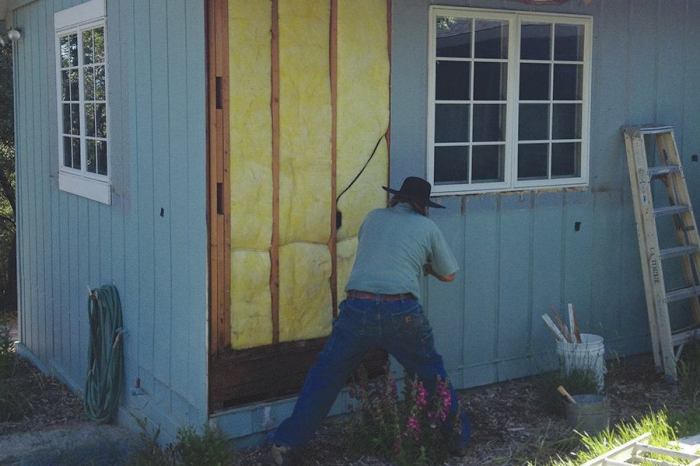
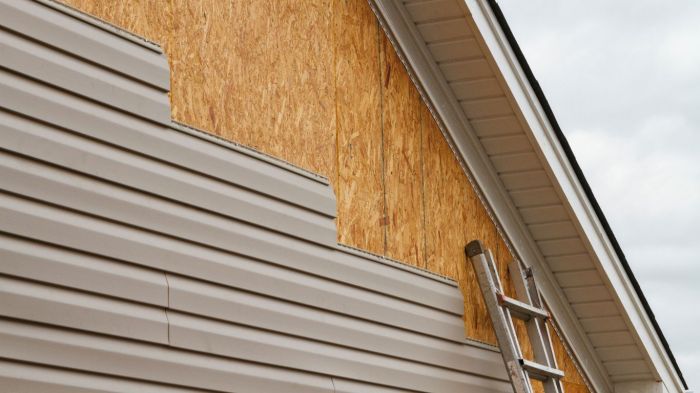
Oriented Strand Board (OSB) Sheathing Installation
Installing OSB sheathing involves several key steps. First, ensure the framing is properly squared and plumb. Then, begin installing the sheathing, starting at a corner and working your way across the wall. Use appropriate fasteners – nails or screws – at the proper spacing, following manufacturer recommendations. Stagger the seams between sheets to create a strong, continuous surface. Pay close attention to proper edge and end nailing to prevent buckling or warping. Ensure proper sealing around windows and doors to prevent water penetration. Always wear appropriate safety gear, including eye protection and gloves.
Sheathing Material Comparison Table
| Material | R-Value (per inch) | Approximate Cost per Square Foot (USD) | Notes |
|---|---|---|---|
| Plywood (1/2 inch) | 0.6 | $1.50 – $2.50 | Moisture resistance varies depending on the type |
| OSB (1/2 inch) | 0.6 | $1.00 – $1.80 | More susceptible to moisture damage than plywood |
| Fiber Cement | 0.2 – 0.3 (varies by thickness) | $2.00 – $4.00 | Excellent moisture resistance, fire resistant |
Sheathing Installation Techniques

Source: bestbuilders.ca
Getting sheathing installed correctly is crucial for a strong, weatherproof building envelope. Proper fastening, spacing, and alignment are key to preventing issues down the line, such as leaks, structural weakness, and energy inefficiency. This section details best practices for sheathing installation on both walls and roofs.
Fastening Sheathing to Wall Studs and Roof Rafters
Using the right fasteners and applying them correctly is paramount. For most sheathing materials, galvanized nails are the standard, but screws offer superior holding power, especially in areas prone to high winds or seismic activity. Nail spacing should follow manufacturer recommendations, but generally, nails are driven at a 6-inch spacing along the edges and 8-12 inches at the panel centers. For roof sheathing, consider using hurricane ties or additional fasteners in high-wind zones. Always drive nails straight to avoid splitting the sheathing or the framing members. Pre-drilling pilot holes can help prevent splitting, particularly with harder sheathing materials.
Sheathing Panel Spacing and Alignment
Maintaining consistent spacing and alignment between sheathing panels is essential for a structurally sound and aesthetically pleasing finished product. Panels should be butted tightly together, ensuring a continuous plane. Avoid leaving large gaps between panels, as this can compromise the building envelope’s weather resistance and structural integrity. Using a straight edge or laser level during installation helps maintain consistent alignment. Small gaps, less than 1/8 inch, are generally acceptable, but larger gaps should be addressed. Shimming may be necessary to achieve proper alignment, particularly when working with uneven framing.
Installing Sheathing on a Sloped Roof
Installing sheathing on a sloped roof requires extra care and attention to safety. Start at the bottom of the roof and work your way up, ensuring each panel is properly aligned and fastened. Always use appropriate safety equipment, including harnesses and fall protection. Stagger the seams of adjacent rows of sheathing to avoid creating continuous lines of weakness. Ensure adequate overlap of panels at the edges, usually at least 12 inches, for watertightness. The bottom edge of each panel should overlap the top edge of the panel below it. This prevents water from penetrating the sheathing. Proper fastening is vital to prevent the sheathing from shifting or coming loose under high wind loads.
Proper Sheathing Overlap and Edge Sealing
Imagine a diagram showing two adjacent sheathing panels meeting at a vertical seam. The top panel overlaps the bottom panel by approximately 12 inches. This overlap is crucial for preventing water penetration. The edges of both panels, where they meet, are sealed with a waterproof sealant, such as construction adhesive or roofing caulk. This sealant creates a continuous watertight barrier along the seam. The illustration would clearly show the sealant applied along the entire length of the overlapped seam. Another image might show a corner detail, where two panels meet at a 90-degree angle, again with significant overlap and a continuous bead of sealant applied along the joint to prevent water intrusion. The overlapping panels should be flush with each other, avoiding any gaps that could allow water to seep in.
Sheathing and Building Codes

Source: ehowcdn.com
Building codes are crucial for ensuring the safety and structural integrity of your home. They dictate the minimum acceptable standards for materials and installation, including exterior sheathing. Ignoring these codes can lead to significant problems down the line, impacting everything from energy efficiency to structural stability. Understanding your local building codes regarding sheathing is paramount before you even start your project.
Understanding the implications of incorrect sheathing installation is key to a successful project. Poorly installed sheathing can lead to a variety of issues that compromise the overall performance and longevity of your building.
Building Code Requirements for Sheathing
Building codes vary by region and are often updated. Generally, they specify the type of sheathing permitted (OSB, plywood, etc.), the required thickness and grade, fastener type and spacing, and proper installation techniques to ensure structural stability, moisture resistance, and fire protection. These specifications are designed to prevent structural failure, water damage, and other problems. For example, in many areas, using undersized fasteners or improper spacing can lead to a rejection during inspection. Similarly, failing to properly seal sheathing joints can result in significant water infiltration and damage to the building envelope. You should consult your local building department for the exact requirements in your area.
Implications of Improper Sheathing Installation
Improper sheathing installation can lead to a cascade of negative consequences. These include structural weakness, increased energy costs, moisture damage, and even the potential for mold growth. For instance, gaps in sheathing can allow air infiltration, leading to drafts and higher heating and cooling bills. Water infiltration due to poor sealing can cause wood rot, mold, and structural damage, necessitating costly repairs. In extreme cases, improper installation could even compromise the structural integrity of the entire building.
Examples of Common Sheathing Installation Mistakes
Several common mistakes can significantly affect the performance of your sheathing. Using the wrong type of sheathing for the application is a frequent error. For instance, using a lower-grade sheathing in a high-wind area could lead to failure. Another frequent problem is improper fastener spacing, leading to inadequate fastening and increased risk of failure. Similarly, failing to properly seal joints and edges leaves the structure vulnerable to moisture intrusion. Finally, not accounting for expansion and contraction can lead to sheathing cracking and failure over time. Each of these errors can result in significant repair costs and potential safety hazards.
Resources for Finding Local Building Codes
Finding your local building codes can be straightforward. The best resource is usually your local building department or city hall. They can provide you with the relevant codes and often offer guidance on interpretations. Additionally, many states and municipalities have their building codes available online. Professional organizations like the International Code Council (ICC) offer resources and publications on building codes. Finally, consulting with a qualified building inspector or contractor can ensure you meet all requirements.
Sheathing and Energy Efficiency
Source: made-in-china.com
Building sheathing plays a surprisingly significant role in a building’s overall energy efficiency. It’s not just about structural support; the sheathing material itself, and how it’s installed, directly impacts how well your building retains heat in winter and keeps cool air inside during summer. This translates to lower energy bills and a smaller carbon footprint.
Sheathing’s impact on energy efficiency stems from its ability to act as an insulation layer and a barrier against air infiltration. By reducing heat transfer through the walls and preventing drafts, sheathing helps maintain a stable indoor temperature, minimizing the workload on your heating and cooling systems.
Thermal Performance of Different Sheathing Materials, Building Sheathing
Different sheathing materials offer varying levels of thermal resistance, measured by their R-value. A higher R-value indicates better insulation. For example, oriented strand board (OSB) generally has a lower R-value than foam sheathing. Extruded polystyrene (XPS) foam sheathing boasts a significantly higher R-value per inch than OSB, meaning it provides superior insulation for the same thickness. Similarly, polyisocyanurate (polyiso) foam offers excellent thermal performance. The choice of sheathing material should consider the climate and desired level of energy efficiency. A colder climate might benefit from higher R-value sheathing like XPS or polyiso, while a milder climate might find OSB sufficient when combined with other insulation strategies.
Proper Sheathing Installation and Energy Loss Reduction
Proper installation is just as crucial as material selection. Gaps and improperly sealed seams in the sheathing can create pathways for air infiltration, negating much of the insulation benefit. Air leaks account for a significant portion of energy loss in buildings. Careful attention to detail during installation, including proper sealing of all joints and edges with appropriate sealant, is essential for maximizing energy efficiency. Furthermore, ensuring a continuous and airtight sheathing layer minimizes thermal bridging, which occurs when heat travels easily through less insulated areas. This is particularly important around windows and doors. Using weather-resistant barrier membranes underneath the sheathing further enhances the building’s air-tightness.
Strategies for Maximizing Energy Efficiency Through Sheathing
Proper sheathing selection and installation are key to reducing energy consumption and costs. Here are some strategies:
- Choose sheathing with a high R-value appropriate for your climate. Consider the long-term cost savings that come with a higher upfront investment in better insulation.
- Ensure continuous insulation. Avoid thermal bridging by carefully sealing all joints and seams with appropriate sealant and using continuous insulation layers.
- Use a weather-resistant barrier beneath the sheathing to prevent moisture penetration and improve air tightness. This minimizes the risk of mold and rot and improves the building’s overall thermal performance.
- Pay close attention to detail during installation to minimize air leaks. Properly fastening sheathing panels and sealing all gaps is critical for effective insulation.
- Consider using high-performance sheathing materials such as XPS or polyiso foam, especially in colder climates, to significantly improve the building’s thermal envelope.
Sheathing and Moisture Management: Building Sheathing

Source: corksoluk.com
Keeping your sheathing dry is crucial for a long-lasting, healthy building. Moisture can lead to mold growth, rot, and structural weakening, significantly impacting the lifespan and energy efficiency of your home. Proper moisture management during and after installation is essential to prevent costly repairs down the line.
Preventing moisture damage to sheathing involves a multi-pronged approach, combining careful installation techniques with the use of appropriate protective materials. Understanding the potential sources of moisture and implementing strategies to mitigate them is key to ensuring the longevity of your building’s structure.
Moisture Control Methods
Effective moisture control begins with selecting the right sheathing material for your climate. For example, in humid climates, moisture-resistant sheathing might be preferred. Beyond material selection, proper installation is vital. This includes ensuring all seams are properly sealed and flashed to prevent water penetration. Using a continuous air barrier is also important to prevent water vapor from migrating into the wall cavity. Proper ventilation is another crucial factor, allowing for air circulation and the evaporation of any trapped moisture. Regular inspections during construction are recommended to quickly identify and address any leaks or moisture problems.
Protecting Sheathing During Construction
Protecting sheathing from the elements during construction is a critical step in preventing moisture damage. This involves covering the sheathing with a suitable weather barrier as soon as possible after installation. This barrier acts as a shield against rain, snow, and wind-driven rain, preventing water from penetrating the sheathing. It’s important to ensure the weather barrier is properly overlapped and sealed at all seams and penetrations to maintain its effectiveness. Additionally, keeping the construction site clean and free of debris helps to prevent damage to the sheathing and promotes better drainage. Storing materials properly and away from direct contact with the ground also prevents moisture absorption.
House Wrap and Moisture Barrier Diagram
Imagine a cross-section of an exterior wall. The outermost layer is the siding. Beneath the siding is a house wrap, a breathable membrane that allows moisture vapor to escape from the wall cavity while preventing liquid water from entering. Directly beneath the house wrap is the sheathing, which provides structural support to the wall. Finally, against the sheathing is an air barrier, often integrated into the house wrap or applied separately. This creates a three-layered system: siding, house wrap (acting as a secondary water barrier and air barrier), and sheathing. The air barrier is vital to prevent air leakage and moisture migration from the interior of the building into the wall assembly. Properly overlapping and sealing all layers is critical to the system’s effectiveness. The house wrap should be installed with proper overlaps, typically 6 inches, and sealed with appropriate tape at all seams and penetrations. The sheathing should be installed according to the manufacturer’s instructions and all seams should be properly sealed. The diagram illustrates how this multi-layered system works together to protect the sheathing from moisture damage.
Sheathing and Structural Integrity
Source: a-listbuilders.com
Building sheathing plays a surprisingly significant role in a structure’s overall strength and stability, going beyond just a weather barrier. It works in conjunction with the framing to create a much stronger, more resilient building envelope. Understanding its contribution is crucial for ensuring a safe and long-lasting building.
Sheathing significantly increases a building’s resistance to various forces, transforming a framework of individual studs and joists into a unified, load-bearing system. This integrated approach dramatically improves the building’s ability to withstand both static and dynamic loads.
Load-Bearing Capacities of Different Sheathing Materials
The load-bearing capacity of sheathing varies considerably depending on the material used. Oriented Strand Board (OSB) and plywood are common choices, each offering different strengths and weaknesses. OSB, due to its manufacturing process, often exhibits slightly lower strength properties than plywood in certain directions, though modern OSB is quite strong. Plywood, with its cross-grained layers, generally provides superior strength and stiffness, particularly when dealing with heavier loads. Other materials like structural insulated panels (SIPs) offer excellent load-bearing capabilities combined with superior insulation values. The specific load-bearing capacity is always detailed in the manufacturer’s specifications and should be considered during design. For example, a standard 7/16″ OSB sheathing panel will have a different load capacity compared to a ¾” plywood panel, impacting the overall structural performance of the wall or roof. Design professionals use these specifications to ensure the sheathing selected can adequately support anticipated loads.
Sheathing’s Role in Resisting Wind Loads and Seismic Forces
Sheathing acts as a diaphragm, transferring wind and seismic loads to the building’s structural frame. This is especially important in areas prone to high winds or earthquakes. Imagine a building’s frame as a skeleton – the sheathing acts like skin and muscles, providing the strength and stability to resist the pressure of wind or the shaking from seismic activity. The larger the sheathing panels and the stronger the material, the more effectively these loads are distributed, reducing the stress on individual framing members. This diaphragm action is critical for preventing racking (twisting) and overall structural failure during extreme weather events or earthquakes. In high-wind areas, the use of stronger sheathing and proper fastening techniques are crucial to prevent damage. Similarly, in earthquake-prone regions, the design often incorporates shear walls reinforced with sheathing to withstand lateral forces.
Reinforcing Weak Points in a Building’s Structure
Sheathing can be strategically used to reinforce structural weaknesses. For instance, in older homes with less robust framing, adding sheathing can significantly improve the overall structural integrity. This is particularly helpful in areas where the framing may be weaker or has deteriorated over time. Furthermore, strategically placed sheathing can enhance the strength of openings like doors and windows, preventing racking and improving the overall stability of the wall section. By carefully planning the placement and type of sheathing, builders can address specific structural deficiencies and create a more robust and secure building. For example, adding extra layers of sheathing around large window openings helps distribute the load and prevent the window frame from bowing under pressure.
Last Word

Source: amazonaws.com
Building sheathing is more than just a layer of material; it’s a critical component influencing a building’s structural soundness, energy efficiency, and longevity. Understanding the different types of sheathing, proper installation methods, and relevant building codes is essential for any successful construction project. By prioritizing careful sheathing selection and installation, you’re investing in a more durable, energy-efficient, and ultimately, safer building. Remember to always consult local building codes and consider professional advice when undertaking any construction work.