Replacing Exterior Wall Sheathing A Comprehensive Guide
Replacing exterior wall sheathing might sound daunting, but understanding the process can save you time, money, and potential headaches down the line. This guide walks you through everything from identifying the need for replacement to selecting the right materials and completing the installation correctly. We’ll cover common causes of sheathing failure, various material options, step-by-step installation techniques, and crucial considerations for budgeting and adhering to building codes. Get ready to tackle this home improvement project with confidence!
We’ll explore the different types of sheathing available, their pros and cons, and how to choose the best option for your climate and building type. Proper installation is key, so we’ll cover techniques for removing old sheathing and installing new sheathing correctly, including important details like fastening, spacing, flashing, and sealant application. Finally, we’ll discuss addressing underlying issues, budgeting, and navigating building codes to ensure a successful and long-lasting repair.
Reasons for Replacing Exterior Wall Sheathing

Source: eliteservicesinc.com
Replacing exterior wall sheathing is a significant undertaking, but often necessary to maintain the structural integrity and weather protection of your home. Ignoring failing sheathing can lead to more extensive and costly repairs down the line, impacting both the building’s lifespan and your wallet. This section details common reasons why sheathing replacement becomes necessary.
Common Causes of Sheathing Failure
Sheathing failure stems from a variety of factors, often interacting to accelerate deterioration. Moisture intrusion is a primary culprit, leading to wood rot, fungal growth, and weakening of the structural integrity. Poor initial installation, using substandard materials, or insufficient protection against the elements all contribute. Insects like termites and carpenter ants can also burrow into the sheathing, creating significant damage that’s often not immediately visible. Finally, age itself plays a role; even with proper installation and maintenance, sheathing materials degrade over time, becoming brittle and more susceptible to damage.
Impact of Weather Damage on Sheathing
Weather damage significantly impacts sheathing lifespan. Prolonged exposure to rain, snow, and ice leads to water absorption, causing swelling, warping, and eventually rot. Extreme temperature fluctuations contribute to cracking and splitting, especially in drier climates. UV radiation from the sun can degrade the surface of the sheathing, reducing its strength and durability. Strong winds can dislodge or damage poorly secured sheathing, potentially leading to further water damage. Coastal areas experience the added challenge of salt spray, which accelerates corrosion and deterioration. For example, a house near the ocean might require sheathing replacement much sooner than one located inland due to the constant exposure to salt.
Comparison of Sheathing Materials and Susceptibility to Damage
Different sheathing materials exhibit varying levels of resistance to damage. Oriented Strand Board (OSB) is a common and cost-effective choice, but it’s more susceptible to moisture damage than plywood. Plywood, particularly exterior-grade plywood, offers greater durability and resistance to moisture, but it’s typically more expensive. Fiber cement sheathing is a highly durable and weather-resistant option, but it’s also the most expensive. Each material’s performance is also influenced by factors such as the quality of the manufacturing process and the proper installation techniques.
Sheathing Material Comparison
| Sheathing Material | Typical Lifespan (Years) | Approximate Cost per Sheet | Maintenance Requirements |
|---|---|---|---|
| Oriented Strand Board (OSB) | 15-25 | $15-$30 | Regular inspection for moisture damage; prompt repair of any damage |
| Exterior-Grade Plywood | 20-30+ | $25-$45 | Regular inspection for moisture damage; prompt repair of any damage |
| Fiber Cement | 30-50+ | $40-$70 | Minimal maintenance; occasional cleaning |
Sheathing Material Selection
Source: forbes.com
Choosing the right sheathing material is crucial for a durable and energy-efficient exterior wall. The selection process depends heavily on factors like your budget, climate, and the overall design of your building. Let’s explore the options available and how to make the best choice for your project.
Exterior Wall Sheathing Materials
Several materials are commonly used for exterior wall sheathing, each with its own set of pros and cons. Understanding these differences is key to making an informed decision.
- Oriented Strand Board (OSB): OSB is a popular choice due to its strength and affordability. It’s made from wood strands bonded together with resin. However, it’s less water-resistant than plywood and can be more susceptible to damage from moisture.
- Plywood: Plywood offers excellent strength and dimensional stability, making it a reliable option for many climates. Exterior-grade plywood is treated to resist moisture, but it’s generally more expensive than OSB.
- Fiber Cement Sheathing: This material combines cement, cellulose fibers, and other additives to create a strong, durable, and highly fire-resistant sheathing. It’s also resistant to moisture, insects, and rot, but it can be more brittle than wood-based options and requires careful handling during installation.
- Concrete Sheathing: Used primarily in commercial or high-performance buildings, concrete sheathing offers exceptional strength and fire resistance. It’s heavy and requires specialized installation techniques. Its high thermal mass can contribute to improved energy efficiency in some climates.
- Metal Sheathing: Metal sheathing, typically made of steel or aluminum, is highly durable and resistant to fire, insects, and rot. It’s lightweight and easy to install, but it can be susceptible to dents and scratches, and its thermal performance may be less ideal than other options unless properly insulated.
Factors Influencing Sheathing Material Selection
Choosing the right sheathing involves considering several critical properties to ensure long-term performance and building integrity. Ignoring these factors can lead to costly repairs down the line.
- Moisture Resistance: This is paramount, especially in humid or rainy climates. Materials with high moisture resistance prevent water damage and rot, extending the lifespan of your walls.
- Strength and Structural Integrity: Sheathing must withstand wind loads and other stresses. The required strength varies depending on the building’s size, location, and design.
- Insulation Value (R-Value): While sheathing primarily provides structural support, some materials offer better insulation than others. Higher R-values contribute to energy efficiency and lower heating and cooling costs. For example, adding rigid foam insulation directly to the sheathing can significantly improve the R-value of a wall assembly.
- Fire Resistance: Fire-resistant sheathing is crucial for enhancing building safety, particularly in areas with stringent fire codes. Materials like fiber cement and concrete offer superior fire protection.
- Cost and Availability: Budget constraints often play a significant role in material selection. It’s important to balance cost with the long-term benefits of a durable and high-performing sheathing material. Local availability also affects pricing and project timelines.
- Climate Considerations: Extreme weather conditions dictate material choices. In areas with high humidity, moisture-resistant sheathing is essential. In areas prone to hurricanes, stronger sheathing is necessary. For example, in coastal regions prone to high winds and moisture, fiber cement sheathing might be preferred over OSB.
- Building Type: The type of building (residential, commercial, etc.) influences sheathing selection. Commercial buildings might require fire-rated sheathing, while residential projects might prioritize cost-effectiveness and ease of installation.
Installation Methods and Techniques

Source: ebyexteriors.com
Replacing exterior wall sheathing is a significant undertaking, requiring careful planning and execution. This section details the process of removing old sheathing and installing new, emphasizing proper techniques for optimal results and longevity. Remember to always prioritize safety and use appropriate personal protective equipment (PPE) throughout the entire process.
Old Sheathing Removal, Replacing exterior wall sheathing
Removing the old sheathing is the first crucial step. Begin by carefully inspecting the existing sheathing to assess its condition and identify any potential hazards, such as nails protruding or areas of significant damage. Use a pry bar to carefully separate the sheathing from the framing, working in sections to avoid damaging the underlying structure. Dispose of the old sheathing responsibly, following local regulations for waste disposal. Always wear safety glasses and gloves to protect yourself from splinters and sharp edges. If encountering any rotted or damaged framing members during this process, these should be replaced before proceeding with a new sheathing installation.
Sheathing Installation: General Principles
Regardless of the sheathing material chosen (OSB, plywood, etc.), several key principles apply to ensure a successful installation. Proper fastening is critical for structural integrity. Use appropriately sized nails or screws, driven straight and flush with the surface to avoid damage to the sheathing or future siding. Maintain consistent spacing between fasteners, following the manufacturer’s recommendations. This ensures even load distribution and prevents stress concentrations that could lead to cracking or failure. Overlapping sheathing panels is also crucial, typically with a minimum overlap of at least 2 inches to ensure water tightness.
Sheathing Installation: Specific Techniques
The installation technique varies slightly depending on the sheathing material. For example, OSB sheathing often requires staggered joints between panels to maximize strength and minimize weak points. Plywood sheathing may have specific orientation requirements to optimize structural performance. Always consult the manufacturer’s instructions for the specific sheathing product being used. These instructions will detail proper installation methods, fastener types, and spacing requirements. Failure to follow these instructions could compromise the structural integrity of the wall.
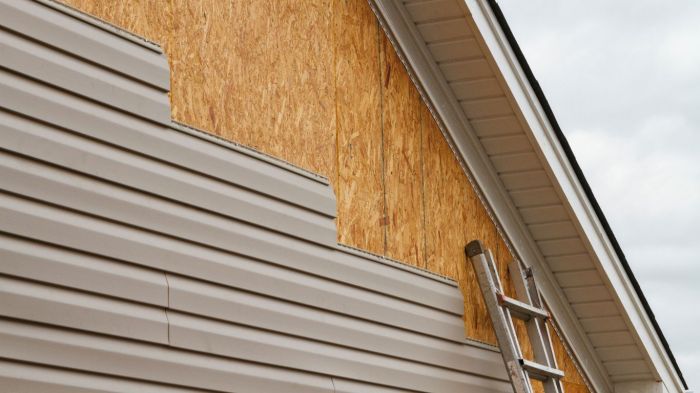
Image 1: Removing Old Sheathing
A worker is carefully using a pry bar to remove a section of old, weathered wood sheathing. Notice the safety glasses and work gloves being worn. The pry bar is inserted between the sheathing and the underlying framing, leveraging the tool to gently separate the materials. This is a crucial step in the process, and care must be taken to avoid damaging the underlying structure. Damaged framing members are visible in the image and require attention before new sheathing installation.
Image 2: Preparing the Framing
The image shows the exposed framing after the old sheathing has been removed. Any damaged or rotted framing members have been replaced. The framing is clean and ready for the installation of new sheathing. This is an important step in ensuring the long-term integrity of the wall system. Note the use of appropriate-sized nails and screws during the framing repair.
Image 3: Installing New OSB Sheathing
The image depicts the installation of a new OSB sheathing panel. Notice the staggered joints between adjacent panels to create a stronger, more stable wall system. The fasteners are evenly spaced and driven flush with the surface of the sheathing. The correct size and type of fastener are used according to the manufacturer’s specifications. This ensures proper load distribution and prevents stress concentrations.
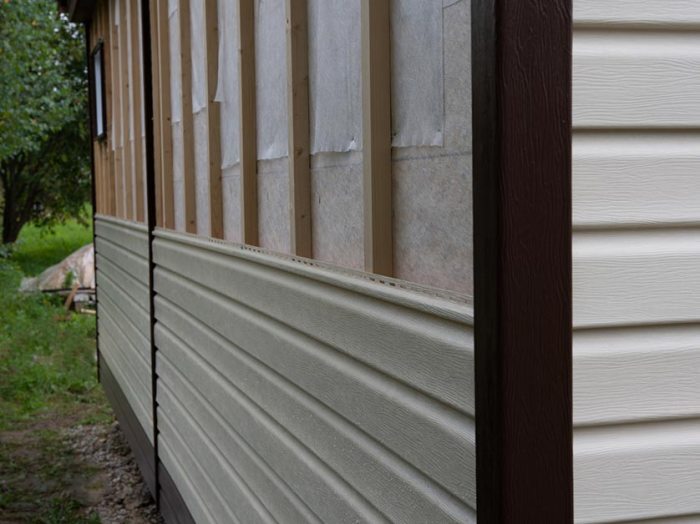
Image 4: Flashing and Sealant Application
This image highlights the critical role of flashing and sealant in preventing water intrusion. Flashing is installed at all penetrations, such as windows and doors, to divert water away from the wall. Sealant is applied to all joints and seams to create a continuous weather barrier. This detail is essential for preventing water damage and maintaining the integrity of the wall system. The sealant is applied neatly and completely around the edges of the sheathing, providing a complete seal.
Image 5: Completed Sheathing Installation
The final image shows the completed sheathing installation. The sheathing is properly installed, fastened, and sealed. The wall is now ready for the installation of the exterior cladding. This is the result of careful planning and execution of the steps Artikeld above. The even spacing of the sheathing and fasteners is visible, ensuring structural integrity.
Addressing Underlying Issues
Source: pritchettroofing.com
Replacing exterior wall sheathing is a great opportunity to address any underlying problems with your home’s structure. Ignoring these issues can lead to future problems and potentially more expensive repairs down the line. Taking the time to thoroughly inspect and repair the framing before installing new sheathing is crucial for a long-lasting, structurally sound exterior.
Addressing underlying issues before installing new sheathing is essential for a successful project. Ignoring these problems can lead to premature failure of the new sheathing and other costly repairs later on. This section Articulates common problems, repair methods, and moisture management strategies.
Common Problems Found During Sheathing Replacement
During sheathing replacement, you’ll likely encounter various issues depending on the age and condition of your home. These can range from minor imperfections to significant structural damage. Proper identification and remediation are key to a successful project. Common problems include rotted or insect-damaged framing members, inadequate insulation, and moisture intrusion evidence.
Repairing or Replacing Damaged Framing Members
Damaged framing members, often caused by moisture damage or insect infestation, need to be addressed before installing new sheathing. This involves carefully assessing the extent of the damage. Small areas of rot can often be treated with a wood hardener and epoxy. However, severely damaged members must be completely replaced. This replacement should involve using pressure-treated lumber in areas prone to moisture, and ensuring proper fastening techniques are used to maintain structural integrity. For example, a rotted stud might need to be replaced by cutting out the damaged section and inserting a new stud, secured with appropriate fasteners such as galvanized nails or screws. Always adhere to local building codes and best practices when performing framing repairs.
Moisture Management
Proper moisture management is paramount to prevent future sheathing problems. This involves ensuring adequate ventilation within the wall cavity to allow moisture to escape. This might include installing or repairing vents, ensuring proper flashing around windows and doors, and using a breathable house under the new sheathing. Water damage can weaken the structure and lead to mold growth, so addressing any sources of water intrusion is vital. For instance, improperly sealed windows can allow water to penetrate the wall, leading to rot and decay. Replacing damaged flashing and caulking are essential steps in preventing this.
Wall Structure Inspection Checklist
Before installing new sheathing, a thorough inspection is necessary. This checklist helps ensure you address all potential problems:
- Inspect all framing members for rot, insect damage, or other signs of deterioration.
- Check for any evidence of moisture intrusion, such as water stains or mold growth.
- Assess the existing insulation levels and determine if additional insulation is needed.
- Examine the condition of existing flashing and caulking around windows and doors.
- Verify the integrity of any existing vapor barriers or house wraps.
- Check for proper ventilation within the wall cavity.
- Ensure all framing members are properly fastened and structurally sound.
Cost Considerations and Budgeting
Source: windows.net
Replacing exterior wall sheathing is a significant investment, so careful budgeting is crucial. Understanding the various cost components will help you plan effectively and avoid unexpected expenses. This section illustrates a sample budget, compares material and labor costs, and offers tips for cost-effective solutions.
Sample Budget Breakdown for Exterior Wall Sheathing Replacement
This budget example assumes a 1,500-square-foot house with standard wall heights. Actual costs will vary based on location, labor rates, material choices, and project complexity. Remember to always obtain multiple quotes from reputable contractors.
| Cost Item | Estimated Cost |
|---|---|
| Materials (Sheathing, fasteners, flashing, etc.) | $5,000 – $10,000 |
| Labor (Demolition, installation, cleanup) | $6,000 – $12,000 |
| Permits | $500 – $1,500 |
| Contingency (for unforeseen issues) | 10% of the total estimated cost |
| Total Estimated Cost | $11,500 – $23,500 |
Cost Comparison of Sheathing Materials and Installation Methods
The cost of sheathing materials varies significantly. Oriented Strand Board (OSB) is generally the most affordable option, followed by plywood, and then engineered wood products like ZIP System sheathing which often includes a built-in weather barrier. Installation methods also impact cost. For example, using a nail gun significantly speeds up the process compared to hand nailing, reducing labor costs. However, the initial investment in a nail gun needs to be factored in. Consider the long-term value and durability offered by different materials when making your selection. For example, a more expensive, durable material might save money in the long run by preventing future repairs.
Cost-Effective Solutions While Maintaining Quality
Several strategies can help you reduce costs without compromising quality. Careful planning and preparation are key. For example, accurately assessing your needs and obtaining multiple quotes from contractors can save a significant amount. Consider doing some of the demolition work yourself if you have the skills and time, but always prioritize safety. Look for sales and discounts on building materials. Finally, explore financing options if needed.
Cost Savings of Preventative Maintenance vs. Reactive Repairs
Preventative maintenance, such as regular inspections and addressing minor issues promptly, can significantly reduce long-term costs compared to reactive repairs, which often involve more extensive and expensive work.
| Scenario | Cost |
|---|---|
| Preventative Maintenance (annual inspection and minor repairs) | $100 – $500 per year |
| Reactive Repair (extensive water damage requiring sheathing replacement) | $10,000 – $25,000 or more |
Building Codes and Permits

Source: slideserve.com
Replacing your exterior wall sheathing isn’t just a DIY project; it involves navigating building codes and obtaining the necessary permits. Ignoring these regulations can lead to fines, delays, and even safety hazards. Understanding the process will ensure a smooth and legal renovation.
Building codes are local regulations designed to ensure the safety and structural integrity of buildings. These codes specify requirements for materials, installation methods, and overall construction practices. For exterior wall sheathing, these codes often address aspects like the type of sheathing allowed (e.g., OSB, plywood, cement board), its thickness and grade, proper fastening techniques, and weather protection measures. Variations exist depending on your location, climate, and the specific type of construction.
Relevant Building Codes and Regulations
Building codes concerning exterior wall sheathing primarily focus on structural stability, moisture resistance, and fire safety. Specific requirements will be detailed in your local building code, often referencing national standards like the International Building Code (IBC). These codes dictate acceptable sheathing materials, minimum thicknesses based on wall height and wind load, proper fastener spacing and type, and the need for water-resistant barriers. For example, a high-wind area might require thicker sheathing or more fasteners than a low-wind area. Similarly, areas prone to hurricanes or wildfires may have more stringent requirements regarding fire-resistant sheathing. Failure to comply with these requirements could result in structural weakness, water damage, or fire hazards.
Obtaining Necessary Permits
The permit application process typically involves submitting detailed plans of your project to your local building department. These plans should clearly show the existing wall construction, the proposed sheathing replacement, the materials to be used, and the installation methods. You’ll need to provide information about the type and grade of sheathing, fastener specifications, and any associated work, such as flashing or vapor barriers. After review, the building department will issue a permit if your plans comply with local codes. Failing to obtain a permit before starting work is a violation and can result in stop-work orders, fines, and difficulties in selling your property in the future. The process and required documentation may vary slightly depending on your location, so it’s best to contact your local building department directly for specific instructions.
Resources for Finding Local Building Code Information
Your local building department is the primary source for information on local building codes. Their website often provides access to the full code document, frequently asked questions and contact information. Additionally, you can often find information through your city or county government websites. National organizations such as the International Code Council (ICC) publish model building codes that many localities adopt, providing a general overview of common standards. However, remember that local variations always exist, so always refer to your specific local codes.
Examples of Common Code Violations
Common code violations related to sheathing installation include using improper sheathing materials (e.g., using a lower grade of plywood than required), insufficient fastener spacing or type (leading to weak attachment and potential failure), neglecting required weather barriers (allowing moisture penetration), and failing to properly seal around windows and doors (creating pathways for water intrusion). These violations can compromise the structural integrity, durability, and energy efficiency of your home, potentially leading to significant repair costs down the line. It’s crucial to meticulously follow the specified codes to avoid these issues.
Conclusive Thoughts

Source: hw.net
Replacing your exterior wall sheathing is a significant undertaking, but with careful planning and execution, it can significantly improve your home’s energy efficiency, durability, and curb appeal. By understanding the causes of sheathing failure, selecting appropriate materials, and following proper installation techniques, you can ensure a successful project that protects your investment for years to come. Remember to always prioritize safety and consult with professionals when needed. Now, go forth and conquer that sheathing!